Chocolate & Caramel No-Bake Cheesecake
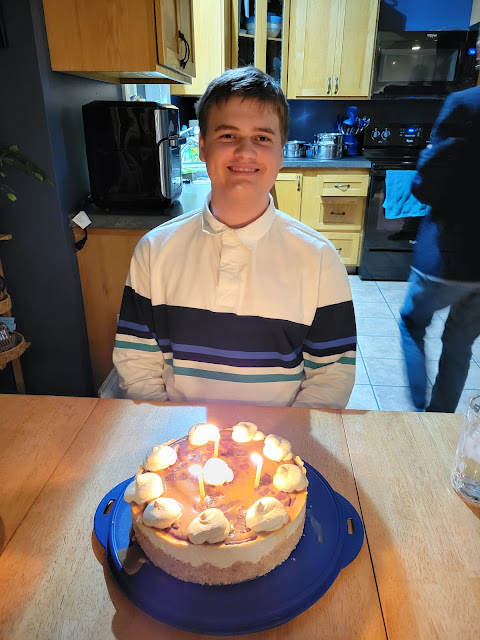
Evan had wanted a cheesecake for his birthday that had caramel and chocolate and after looking around online we settled on making a turtle cheesecake without the nuts. Then two days before his party the heating element in our stove broke and I was left with no oven. I started searching for no-bake cheesecake recipes and found a few I combined/modified to work with the ingredients I had already purchased.
We made a delicious no-bake chocolate & caramel cheesecake with zero baking!
Ingredients:
For the crust:
1 1/2 sleeves (2 cups) of graham cracker crumbs
1/2 cup melted butter
1 Tablespoon brown sugar
2 Tablespoons granulated sugar
For the filling:
1 1/4 cups heavy whipping cream-- keep chilled until ready to use
3 blocks (8 ounces each) cream cheese
1/2 cup granulated sugar
2 Tablespoons powdered sugar
4 Tablespoons sour cream
1 teaspoon vanilla extract
1/4 cup caramel sundae topping
For the topping:
1/2 semi sweet chocolate chips
1 1/2 Tablespoons heavy whipping cream
1/4 cup caramel sundae topping
For the caramel whipped cream:
1 cup heavy whipping cream
1/4 cup caramel sundae topping
1. Make the crust-- in a medium bowl combine graham cracker crumbs, both sugars, and melted butter until all the crumbs are well coated then press into the bottom of a springform pan; I like to press a bit of the crust up the sides of the pan too but I'm not fussy about it being perfect. Then I set this in the freezer to set while I prepared the filling.
2. Using COLD heavy whipping cream and my stand mixer I made whipped cream. It's simple to do; using a whisk on medium speed it only takes 4 or 5 minutes until the heavy whipping cream forms stiff peaks. I then scooped all the whipping cream into a separate bowl and stuck it back in the refrigerator to keep it cold until I was ready to mix it into the cheesecake part of the filling.
3. I mixed the cheesecake filling together in the bowl of my stand mixer as well and since I was going to be mixing it in with the whipped cream in the next step I didn't even bother to wash or rinse out my bowl. I combined the 3 blocks of cream cheese with both the sugars on medium speed using my paddle attachment. Then slowly added in the sour cream, extract, and caramel topping. Mixing until I had a nice smooth creamy cheesecake layer. I used a spoon to take a small test and make sure I could taste a bit of the caramel; knowing I could add more at this step if I needed to.
4. Gently fold in the whipped cream by hand using a rubber spatula. Mixing until you have a consistent color and texture.
5. Take the crust out of the freezer and spread the cheesecake filling inside. I then used an off- set spatula run under HOT water and wiped dry to smooth the filling out (I had to rinse/ heat it a few times to get all the way around the pan). It is not necessary to do; but it does give the cheesecake a more professional looking finish. Cover with plastic wrap or tin foil and let sit in the fridge for several hours or overnight.
6. In a glass measuring cup I combined the chocolate chips with whipping cream and heated them in the microwave in 30 second increments until the chocolate was soft. I stirred and mixed until I had a nice uniform chocolate ganache and then let it sit until it was room temperature before spreading onto the cheesecake (if you don't wait for it to cool off it will melt the cheesecake).
8. Drizzle the caramel topping over the top of the cheesecake; if you need to you can heat it up slightly but I found that the caramel was soft enough as is.
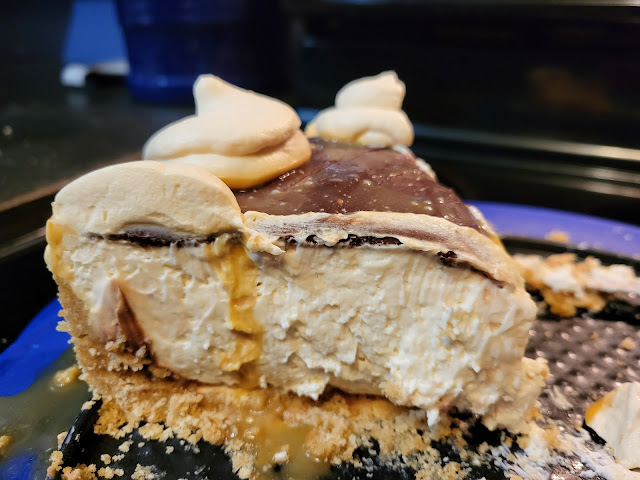
9. Using a cold bowl and cold whipping cream I beat the whipping cream on medium for a few minutes until soft peaks began to form and then added in the caramel topping. It made a delicious caramel whipped cream (truthfully it made far more than I needed but we enjoyed it throughout the week on hot cocoa and over ice cream). I put the whipped cream into a piping bag, took my cheesecake out of the spring form pan (you can see where the caramel topping spread out and soaked into the cake a bit). I cut the tip off the piping bag and piped a few small mounds of whipped cream.
It was delicious and such a huge hit!
 |
| Sorry it's not the greatest photo; it gets so dark now in the evenings! |
I used a large, sharp knife that I heated with hot water to slice through and serve the cake.
Linking up with: Fine/Whatever,


.png)


Looks amazing! Good job finding a recipe that didn´t require baking since your oven was out. Speaking of the latter, I´m sure that was stressful but you pulled it off. Thanks for the recipe. I may try that sometime. It sounds like it definitely takes some time but it´s worth it.
ReplyDeleteThank you! I was amazed that I was able to find one where I had ALL the ingredients already on hand for it.
DeleteUmmm I really need this in my life ;)
ReplyDeleteI was so grateful the kids gobbled up the leftovers or I'm not sure I would have been able to stop eating it. LOL
DeleteYummy treat for the eyes too!
ReplyDeleteAw, thank you!
DeleteI'm so glad you shared this recipe! This looks SO GOOD!!
ReplyDeleteIt was delicious! I love a good no-bake dessert.
DeleteDelicious and what a yummy bonus to have caramel whipped cream for your hot cocoa or ice cream!
ReplyDeleteYes, I was loving that extra caramel whipped cream.
DeleteThat is one incredibly birthday dessert! I would need a birthday once a month if I lived at your house....so many yummy treats!!
ReplyDeleteAw, thank you!
DeleteOh my word! I'm so craving for a slice of it!
ReplyDeleteThank you!
DeleteLooks so good! I had an apple cheesecake at an event last week and it was yummy. Not something I'd think of doing but it tasted great. Happy birthday to your son!
ReplyDeleteOh that sounds delicious too!
DeleteThat's so impressive that you made this without the oven. Looks fabulous,
ReplyDeleteXOOX
Jodie
Thank you! I have gotten really good at cooking without my oven this past month..
DeleteHappy birthday to your son! Cheese cakes are also a favorite in my family-this one looks divine!
ReplyDeleteThank you!
DeleteGreat job & creativity! Happy birthday and yum for the perfect cake!
ReplyDeleteThanks!!
DeleteThat looks delicious, Joanne! I love just about all kinds of cheesecakes! Happy birthday to Evan!
ReplyDeletehttps://marshainthemiddle.com/
Thank you!
DeleteOh my.. that looks so good and so easy to make as well.
ReplyDeleteThank you! I thought it was pretty easy; a bit time consuming but easy.
DeleteLooks amazing and so easy!
ReplyDeleteThank you!
DeleteThat looks delicious. Happy birthday! I like how it looks fairly simple to make, but it looks absolutely delicious.
ReplyDeleteThank you!
DeleteWOW love the no bake I visited you via The Happy Now Blog Link- Up #395
ReplyDeleteI linked up this week with = 38+39. Come and join us at SeniorSalonPitStop. You will find the linkup information under BLOGGING.
Thank you for stopping by! I typically do link up at the Senior Salon Pit Stop but was on vacation this past week and am just starting to play catch up with ALL the blogging tasks; thank you for the reminder though.
DeleteYUM, looks good and I love that it's no bake! Just wish it didn't have so much sugar :( Thanks so much for linking up at the #UnlimitedLinkParty 134. Pinned.
ReplyDeleteThank you!
DeleteThat looks amazing!!
ReplyDeleteThank you!
DeleteThis looks completely amazing! Wow! Pinning. :) Visiting from Crazy Little Lovebirds linkup. (I'd love you to share this post at my linkup as well, if you'd like: https://lifetalesbooks.blogspot.com/p/calling-fellow-bloggers.html This week's linkup closes tomorrow morning, but if you miss it, catch us on Monday morning.)
ReplyDeleteThanks for the pin!
DeleteMy pleasure! :)
DeleteJoanne, this sounds fantastic! I'm all about no bake desserts. Bookmarked so I can try later.
ReplyDeleteVisiting today from Crazy Little Love Birds #12&13
I hope you like it as much as we did!
DeleteThanks so much for sharing this post at the Will Blog for Comments #12 linkup. :) Hope to see you there next week, too.
ReplyDeleteThank you so much for hosting!
DeleteOh that looks like a wonderful treat! Thanks for sharing at the What's for Dinner party - Hope you have a fabulous week!
ReplyDeleteThank you!
DeleteNo wonder he has such a big smile on his face, your recipe looks fantastic. Bernadette, newclassicrecipe.com
ReplyDeleteAw, thank you!
DeleteThis looks scrumptious!!! Thank you for sharing the recipe!
ReplyDeleteThank you!
DeleteWow! When I saw this earlier visiting your blog I was blown away, so beautiful and I am sure just as delicious!
ReplyDeleteThank you so much!!
DeleteThis looks absolutely amazing! Thank you for sharing at Tell It To Me Tuesday! I hope to see you again this week.
ReplyDeleteThank you!
DeleteYour photo was good enough to tell just how decadent this dessert must have been. Oh, my gravy. My mouth is truly watering. I don't have a cheesecake pan. Might need to remedy that and give this recipe a try. It looks positively delicious.
ReplyDeleteThank you!
DeleteJoanne, thank you for sharing with us at Crazy Little Love Birds link party #10. It looks absolutely amazing!
ReplyDeleteYou're welcome! Thank YOU for hosting!
DeleteLoving that caramel drizzle on top. Thanks for sharing on SSPS, hope to see you again next week.
ReplyDeleteYou're welcome!
DeleteThis is a proper lemons to lemonade where you made the most of your lack of oven. This is my favourite combo - chocolate and caramel so this will be a feature at this week's Handmade Monday :-)
ReplyDeleteThank you!!
Delete